
Graceful shutdown in Kubernetes
April 2024
TL;DR: In this article, you will learn how to prevent broken connections when a Pod starts or shuts down. You will also learn how to shut down long-running tasks and connections gracefully.
In Kubernetes, creating and deleting Pods is one of the most common tasks.
Pods are created when you execute a rolling update, scale deployments, for every new release, for every job and cron job, etc.
However, pods are also deleted and recreated after evictions—when you mark a node as not schedulable, for example.
If the nature of those pods is so ephemeral, what happens when a pod is in the middle of responding to a request but is told to shut down?
Is the request completed before shutdown?
What about subsequent requests? Are those redirected somewhere else?
Table of contents
- What happens when you create a Pod in Kubernetes
- The kubelet creates and look after the pods
- Pods, Services and Endpoints
- Endpoints are the Kubernetes currency
- What happens when you delete a Pod
- How to gracefully shut down pods
- Graceful shutdown with a preStop hook
- Long graceful shutdowns and cluster autoscaling
- Graceful shutdown for long-lived connections and long-running tasks
What happens when you create a Pod in Kubernetes
Before discussing what happens when a Pod is deleted, it's necessary to discuss what happens when a Pod is created.
Let's assume you want to create the following Pod in your cluster:
pod.yaml
apiVersion: v1
kind: Pod
metadata:
  name: my-pod
spec:
  containers:
    - name: web
      image: nginx
      ports:
        - name: web
          containerPort: 80
You can submit the YAML definition to the cluster with the following command:
bash
kubectl apply -f pod.yamlWhen you enter the command, kubectl submits the Pod definition to the Kubernetes API.
This is where the journey begins.
The API receives and inspects the Pod definition and subsequently stored in the database — etcd.
The Pod is also added to the Scheduler's queue.
The Scheduler:
- Inspects the definition.
- Collects details about the workload, such as CPU and memory requests, and then
- Decides which Node is best suited to run it (through a process called Filters and Predicates).
At the end of the process:
- The Pod is marked as Scheduled in etcd.
- The Pod has a Node assigned to it.
- The state of the Pod is stored in etcd.
But the Pod still does not exist.
 1/3
1/3When you submit a Pod with
kubectl apply -f, the YAML is sent to the Kubernetes API. 2/3
2/3The API saves the Pod in the database — etcd.
 3/3
3/3The scheduler assigns the best node for that Pod, and the Pod's status changes to Pending. The Pod exists only in etcd.
The previous tasks happened in the control plane, and the state is stored in the database.
So who is creating the Pod in your Nodes?
The kubelet creates and look after the pods
The kubelet's job is to poll the control plane for updates.
You can imagine the kubelet relentlessly asking the control plane: "I look after the worker Node 1; is there any new Pod for me?".
When there is a Pod, the kubelet creates it.
Sort of.
The kubelet doesn't create the Pod by itself. Instead, it delegates the work to three other components:
- The Container Runtime Interface (CRI) creates the containers for the Pod.
- The Container Network Interface (CNI) connects the containers to the cluster network and assigns IP addresses.
- The Container Storage Interface (CSI) mounts volumes in your containers.
In most cases, the Container Runtime Interface (CRI) is doing a similar job to:
bash
docker run -d <my-container-image>The Container Networking Interface (CNI) is a bit more interesting because it is in charge of:
- Generating a valid IP address for the Pod.
- Connecting the container to the rest of the network.
As you can imagine, several ways exist to connect the container to the network and assign a valid IP address (you could choose between IPv4 or IPv6 or multiple IP addresses).
If you are interested in learning more about Linux network namespaces and CNIs, you should check out this article on tracing the path of network traffic in Kubernetes
When the Container Network Interface finishes its job, the Pod is connected to the rest of the network and has a valid IP address assigned.
There's only one issue.
The kubelet knows about the IP address (because it invoked the Container Network Interface), but the control plane does not.
No one told the control plane that the Pod has an IP address assigned and it's ready to receive traffic.
As far as the control plane is concerned, the Pod is still being created.
It's the job of the kubelet to collect all the details of the Pod, such as the IP address, and report them back to the control plane.
Inspecting etcd would reveal where the Pod is running and its IP address.
 1/5
1/5The Kubelet polls the control plane for updates.
 2/5
2/5When a new Pod is assigned to its Node, the kubelet retrieves the details.
 3/5
3/5The kubelet doesn't create the Pod itself. It relies on the Container Runtime Interface, Container Network Interface, and Container Storage Interface.
 4/5
4/5Once all three components have been completed, the Pod is Running in your Node and has an IP address assigned.
 5/5
5/5The kubelet reports the IP address back to the control plane.
If the Pod isn't part of any Service, this is the journey's end.
The Pod has been created and is ready to use.
When the Pod is part of the Service, a few more steps are needed.
Pods, Services and Endpoints
When you create a Service, there are usually two pieces of information that you should pay attention to:
- The selector, which is used to specify the Pods that will receive the traffic.
- The
targetPort— the port the Pods use to receive traffic.
A typical YAML definition for the Service looks like this:
service.yaml
apiVersion: v1
kind: Service
metadata:
  name: my-service
spec:
  ports:
  - port: 80
    targetPort: 3000
  selector:
    name: app
When you submit the Service to the cluster with kubectl apply, Kubernetes finds all the Pods that have the same label as the selector (name: app) and collects their IP addresses — but only if they passed the Readiness probe.
Then, for each IP address, it concatenates the IP address and the port.
If the IP address is 10.0.0.3 and the targetPort is 3000, Kubernetes concatenates the two values and calls them an endpoint.
IP address + port = endpoint
---------------------------------
10.0.0.3   + 3000 = 10.0.0.3:3000
The endpoints are stored in etcd in another object called Endpoint.
Confused?
Kubernetes refers to:
- endpoint (in this article and the Learnk8s material, referred to as a lowercase
eendpoint) is the IP address + port pair (10.0.0.3:3000). - Endpoint (in this article and the Learnk8s material this is referred to as an uppercase
EEndpoint) is a collection of endpoints.
The Endpoint object is a real object in Kubernetes, and for every Service, Kubernetes automatically creates an Endpoint object.
You can verify that with:
bash
kubectl get services,endpoints
NAME                   TYPE        CLUSTER-IP     EXTERNAL-IP   PORT(S)
service/my-service-1   ClusterIP   10.105.17.65   <none>        80/TCP
service/my-service-2   ClusterIP   10.96.0.1      <none>        443/TCP

NAME                     ENDPOINTS
endpoints/my-service-1   172.17.0.6:80,172.17.0.7:80
endpoints/my-service-2   192.168.99.100:8443
The Endpoint collects all the IP addresses and ports from the Pods.
But not just one time.
The Endpoint object is refreshed with a new list of endpoints when:
- A Pod is created.
- A Pod is deleted.
- A label is modified on the Pod.
So you can imagine that every time you create a Pod and after the kubelet posts its IP address to the control plane, Kubernetes updates all the endpoints to reflect the change:
bash
kubectl get services,endpoints
NAME                   TYPE        CLUSTER-IP     EXTERNAL-IP   PORT(S)
service/my-service-1   ClusterIP   10.105.17.65   <none>        80/TCP
service/my-service-2   ClusterIP   10.96.0.1      <none>        443/TCP

NAME                     ENDPOINTS
endpoints/my-service-1   172.17.0.6:80,172.17.0.7:80,172.17.0.8:80
endpoints/my-service-2   192.168.99.100:8443
The endpoint is stored in the control plane, and the Endpoint object was updated.
 1/8
1/8In this picture, a single Pod is deployed in your cluster. The Pod belongs to a Service. If you were to inspect etcd, you would find the Pod's details and Service.
 2/8
2/8What happens when a new Pod is deployed?
 3/8
3/8Kubernetes has to keep track of the Pod and its IP address. The Service should route traffic to the new endpoint, so the IP address and port should be propagated.
 4/8
4/8What happens when another Pod is deployed?
 5/8
5/8The exact same process. A new "row" for the Pod is created in the database, and the endpoint is propagated.
 6/8
6/8What happens when a Pod is deleted, though?
 7/8
7/8The Service immediately removes the endpoint, and, eventually, the Pod is removed from the database too.
 8/8
8/8Kubernetes reacts to every small change in your cluster.
Are you ready to start using your Pod?
There's more.
A lot more!
Endpoints are the Kubernetes currency
Endpoints are used by several components in Kubernetes.
Kube-proxy uses the endpoints to set up iptables rules on the Nodes.
So, every time an Endpoint (the object) changes, kube-proxy retrieves the new list of IP addresses and ports and writes the new iptables rules.
 1/6
1/6Let's consider this three-node cluster with two Pods and no Services. The state of the Pods is stored in etcd.
 2/6
2/6What happens when you create a Service?
 3/6
3/6Kubernetes created an Endpoint object and collects all the endpoints (IP address and port pairs) from the Pods.
 4/6
4/6Kube-proxy daemon is subscribed to changes to Endpoints.
 5/6
5/6When an Endpoint is added, removed or updated, kube-proxy retrieves the new list of endpoints.
 6/6
6/6Kube-proxy uses the endpoints to create iptables rules on each Node of your cluster.
The Ingress controller uses the same list of endpoints.
The Ingress controller is that component in the cluster that routes external traffic into the cluster.
When you set up an Ingress manifest, you usually specify the Service as the destination:
ingress.yaml
apiVersion: networking.k8s.io/v1
kind: Ingress
metadata:
  name: my-ingress
spec:
  rules:
  - http:
      paths:
      - backend:
          service:
            name: my-service
            port:
              number: 80
        path: /
        pathType: Prefix
In reality, the traffic is not routed to the Service.
Instead, the Ingress controller sets up a subscription to be notified every time the endpoints for that Service change.
The Ingress routes the traffic directly to the Pods, skipping the Service.
As you can imagine, every time there is a change to an Endpoint (the object), the Ingress retrieves the new list of IP addresses and ports and reconfigures the controller to include the new Pods.
 1/9
1/9In this picture, there's an Ingress controller with a Deployment with two replicas and a Service.
 2/9
2/9If you want to route external traffic to the Pods through the Ingress, you should create an Ingress manifest (a YAML file).
 3/9
3/9As soon as you
kubectl apply -f ingress.yaml, the Ingress controller retrieves the file from the control plane. 4/9
4/9The Ingress YAML has a
serviceNameproperty that describes which Service it should use. 5/9
5/9The Ingress controller retrieves the list of endpoints from the Service and skips it. The traffic flows directly to the endpoints (Pods).
 6/9
6/9What happens when a new Pod is created?
 7/9
7/9You know already how Kubernetes creates the Pod and propagates the endpoint.
 8/9
8/9The Ingress controller subscribes to endpoint changes. Since there's an incoming change, it retrieves the new list of endpoints.
 9/9
9/9The Ingress controller routes the traffic to the new Pod.
There are more examples of Kubernetes components that subscribe to changes to endpoints.
CoreDNS, the DNS component in the cluster, is another example.
If you use Services of type Headless, CoreDNS will have to subscribe to changes to the endpoints and reconfigure itself every time an endpoint is added or removed.
The same endpoints are consumed by service meshes such as Istio or Linkerd by cloud providers to create Services of type:LoadBalancer and countless operators.
You must remember that several components subscribe to change to endpoints and might receive notifications about endpoint updates at different times.
Is it enough, or is there something happening after you create a Pod?
This time, you're done!
Here is a quick recap of what happens when you create a Pod:
- The Pod is stored in etcd.
- The scheduler assigns a Node. It writes the node in etcd.
- The kubelet is notified of a new and scheduled Pod.
- The kubelet delegates creating the container to the Container Runtime Interface (CRI).
- The kubelet delegates attaching the container to the Container Network Interface (CNI).
- The kubelet delegates mounting volumes in the container to the Container Storage Interface (CSI).
- The Container Network Interface assigns an IP address.
- The kubelet reports the IP address to the control plane.
- The IP address is stored in etcd.
And if your Pod belongs to a Service:
- The kubelet waits for a successful Readiness probe.
- All relevant Endpoints (objects) are notified of the change.
- The Endpoints add a new endpoint (IP address + port pair) to their list.
- Kube-proxy is notified of the Endpoint change. Kube-proxy updates the iptables rules on every node.
- The Ingress controller is notified of the Endpoint change. The controller routes traffic to the new IP addresses.
- CoreDNS is notified of the Endpoint change. If the Service is of type Headless, the DNS entry is updated.
- The cloud provider is notified of the Endpoint change. If the Service is of
type: LoadBalancer, the new endpoint are configured as part of the load balancer pool. - Any service mesh installed in the cluster is notified of the Endpoint change.
- Any other operator subscribed to Endpoint changes is notified, too.
Such a long list for what is surprisingly a common task — creating a Pod.
The Pod is Running.
It is time to discuss what happens when you delete it.
What happens when you delete a Pod
You might have guessed it already, but when the Pod is deleted, you must follow the same steps but reversely.
First, the endpoint should be removed from the Endpoint (object).
This time, the Readiness probe is ignored, and the endpoint is removed immediately from the control plane.
That, in turn, fires off all the events to kube-proxy, Ingress controller, DNS, service mesh, etc.
Those components will update their internal state and stop routing traffic to the IP address.
Since the components might be busy doing something else, there is no guarantee on how long it will take to remove the IP address from their internal state.
For some, it could take less than a second; for others, it could take more.
 1/5
1/5If you delete a Pod with
kubectl delete pod,the command reaches the Kubernetes API first. 2/5
2/5The message is intercepted by a specific controller in the control plane: the Endpoint controller.
 3/5
3/5The Endpoint controller issues a command to the API to remove the IP address and port from the Endpoint object.
 4/5
4/5Who listens for Endpoint changes? Kube-proxy, the Ingress controller, CoreDNS, etc., are notified of the change.
 5/5
5/5A few components, such as kube-proxy, might need some extra time to propagate the changes further.
At the same time, the status of the Pod in etcd is changed to Terminating.
The kubelet is notified of the change and delegates:
- Unmounting any volumes from the container to the Container Storage Interface (CSI).
- Detaching the container from the network and releasing the IP address to the Container Network Interface (CNI).
- Destroying the container to the Container Runtime Interface (CRI).
In other words, Kubernetes follows precisely the same steps to create a Pod but in reverse.
 1/3
1/3If you delete a Pod with
kubectl delete pod,the command reaches the Kubernetes API first. 2/3
2/3When the kubelet polls the control plane for updates, it notices that the Pod was deleted.
 3/3
3/3The kubelet delegates destroying the Pod to the Container Runtime Interface, Container Network Interface and Container Storage Interface.
However, there is a subtle but essential difference.
When you terminate a Pod, removing the endpoint and the signal to the kubelet are issued simultaneously.
When you create a Pod for the first time, Kubernetes waits for the kubelet to report the IP address and then kicks off the endpoint propagation.
However, when you delete a Pod, the events start in parallel.
And this could cause quite a few race conditions.
What if the Pod is deleted before the endpoint is propagated?
 1/3
1/3Deleting the endpoint and deleting the Pod happen simultaneously.
 2/3
2/3So you could end up deleting the endpoint before kube-proxy updates the iptables rules.
 3/3
3/3Or you might be luckier, and the Pod is deleted only after the endpoints are fully propagated.
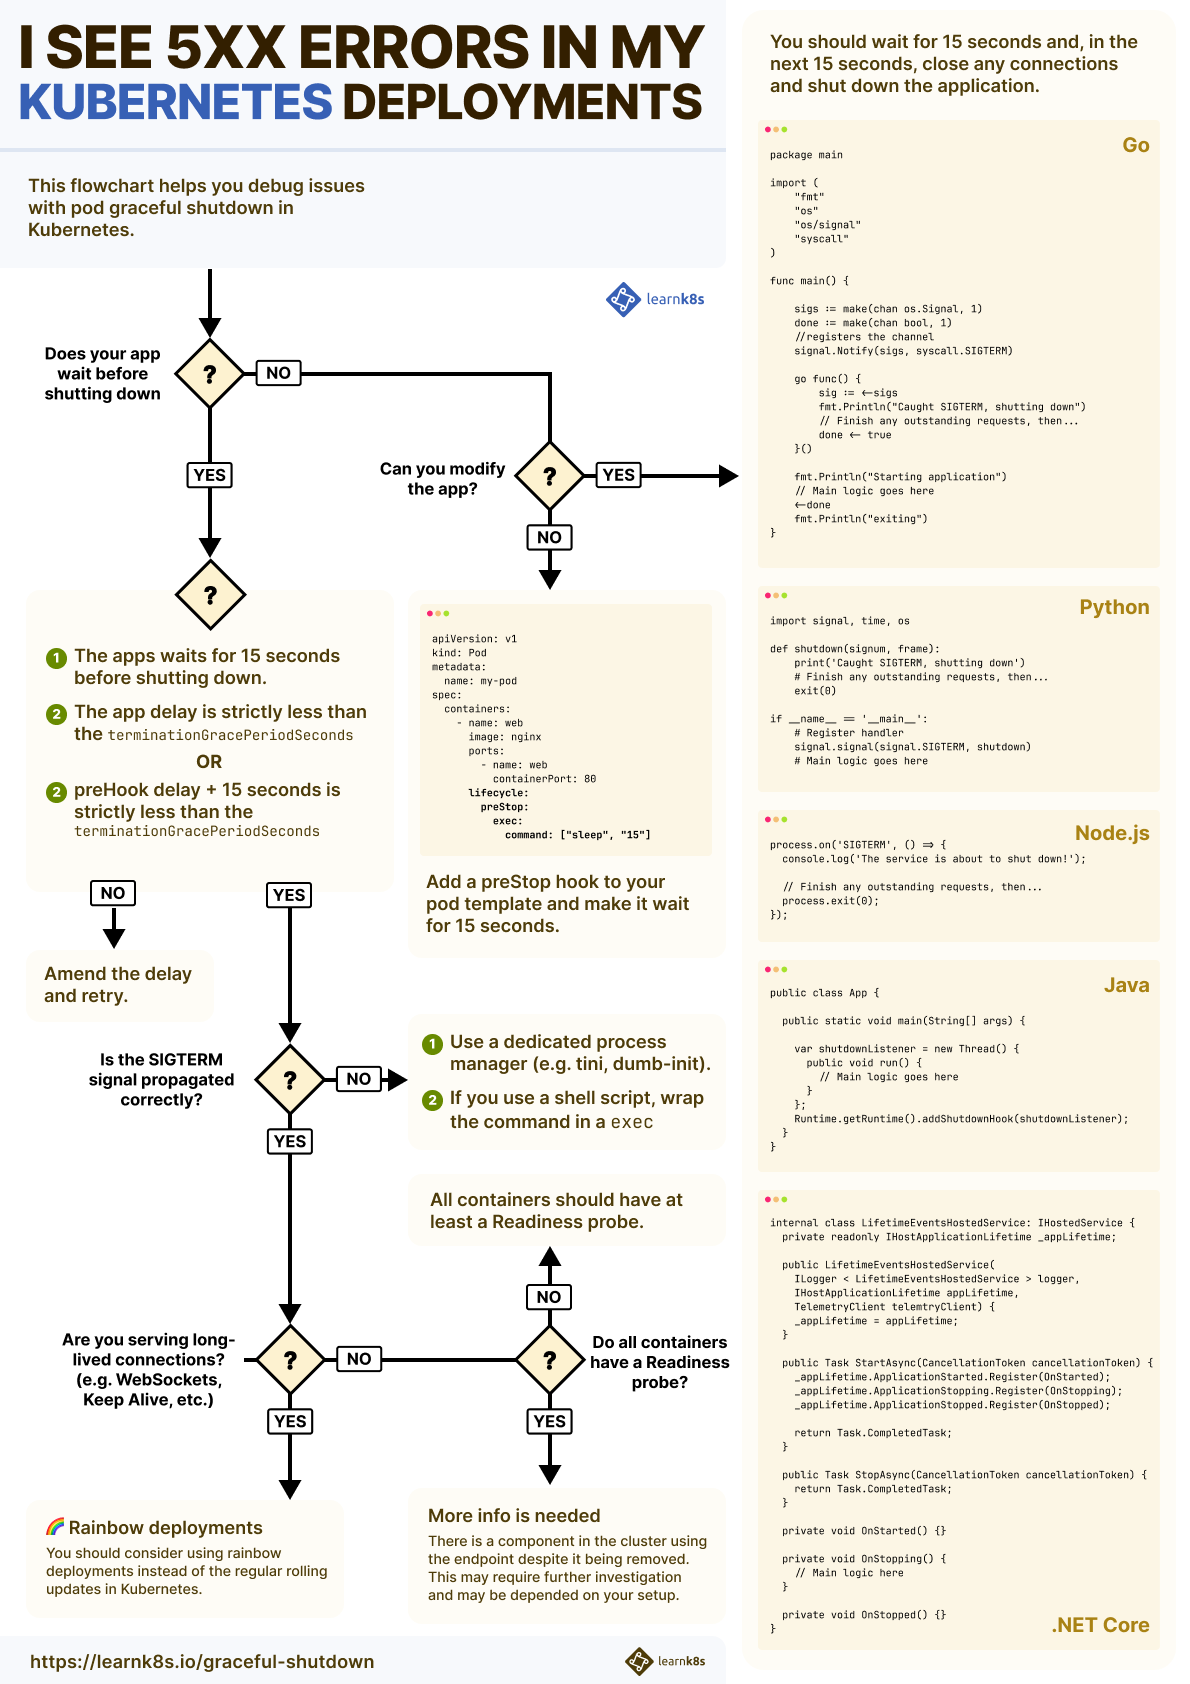
How to gracefully shut down pods
When a Pod is terminated before the endpoint is removed from kube-proxy or the Ingress controller, you might experience downtime.
And, if you think about it, it makes sense.
Kubernetes is still routing traffic to the IP address, but the Pod is no longer there.
The Ingress controller, kube-proxy, CoreDNS, etc., didn't have enough time to remove the IP address from their internal state.
Ideally, Kubernetes should wait for all cluster components to have an updated list of endpoints before deleting the pod.
But Kubernetes doesn't work like that.
Kubernetes offers robust primitives to distribute the endpoints (i.e. the Endpoint object and more advanced abstractions such as Endpoint Slices).
However, Kubernetes does not verify that the components that subscribe to endpoint changes are up-to-date with the cluster's state.
So what can you do to avoid these race conditions and make sure that the Pod is deleted after the endpoint is propagated?
You should wait.
When the Pod is about to be deleted, it receives a SIGTERM signal.
Your application can capture that signal and start shutting down.
Since it's unlikely that the endpoint is immediately deleted from all components in Kubernetes, you could:
- Wait a bit longer before exiting.
- Still process incoming traffic, despite the
SIGTERM. - Finally, close existing long-lived connections (perhaps a database connection or WebSockets).
- Terminate the process.
Let's have a look at a few examples:
package main

import (
  "fmt"
  "os"
  "os/signal"
  "syscall"
)

func main() {

  sigs := make(chan os.Signal, 1)
  done := make(chan bool, 1)
  //registers the channel
  signal.Notify(sigs, syscall.SIGTERM)

  go func() {
    sig := <-sigs
    fmt.Println("Caught SIGTERM, shutting down")
    // Finish any outstanding requests, then...
    done <- true
  }()

  fmt.Println("Starting application")
  // Main logic goes here
  <-done
  fmt.Println("exiting")
}
import signal, time, os def shutdown(signum, frame): print('Caught SIGTERM, shutting down') # Finish any outstanding requests, then... exit(0) if __name__ == '__main__': # Register handler signal.signal(signal.SIGTERM, shutdown) # Main logic goes hereconst express = require('express'); const app = express(); app.listen(3000, () => console.log('Server is up using port 3000')); process.on('SIGTERM', async () => { await wait(15 * 1000) app.close() // terminating the server db.close() // closing any other connection process.exit(0) });public class App { public static void main(String[] args) { var shutdownListener = new Thread() { public void run() { // Main logic goes here } }; Runtime.getRuntime().addShutdownHook(shutdownListener); } }internal class LifetimeEventsHostedService: IHostedService { private readonly IHostApplicationLifetime _appLifetime; public LifetimeEventsHostedService( ILogger < LifetimeEventsHostedService > logger, IHostApplicationLifetime appLifetime, TelemetryClient telemtryClient) { _appLifetime = appLifetime; } public Task StartAsync(CancellationToken cancellationToken) { _appLifetime.ApplicationStarted.Register(OnStarted); _appLifetime.ApplicationStopping.Register(OnStopping); _appLifetime.ApplicationStopped.Register(OnStopped); return Task.CompletedTask; } public Task StopAsync(CancellationToken cancellationToken) { return Task.CompletedTask; } private void OnStarted() {} private void OnStopping() { // Main logic here } private void OnStopped() {} }
How long should you wait?
By default, Kubernetes will send the SIGTERM signal and wait 30 seconds before force-killing the process.
You could use the first 15 seconds to continue operating as if nothing happened.
The interval should be enough to propagate the endpoint removal to kube-proxy, Ingress controller, CoreDNS, etc.
Consequently, less and less traffic will reach your Pod until it stops.
After 15 seconds, there will be no traffic, and it's safe to close your connection with the database (or any persistent connections) and terminate the process.
If any component in your cluster hasn't disposed of the endpoints within 15 seconds, you should increase the delay (perhaps to 20 or 25 seconds).
However, you should remember that Kubernetes will forcefully kill the process after 30 seconds (unless you change the terminationGracePeriodSeconds in your Pod definition).
What if you can't change the code to listen for a SIGTERM and wait longer?
You could invoke a script to wait for a fixed amount of time and then let the app exit.
Graceful shutdown with a preStop hook
Before the SIGTERM is invoked, Kubernetes exposes a preStop hook in the Pod.
You could set the preStop to hook to wait for 15 seconds.
Let's have a look at an example:
pod.yaml
apiVersion: v1
kind: Pod
metadata:
  name: my-pod
spec:
  containers:
    - name: web
      image: nginx
      ports:
        - name: web
          containerPort: 80
      lifecycle:
        preStop:
          exec:
            command: ["sleep", "15"]
The preStop hook is one of the Pod LifeCycle hooks.
It's important to notice that using the preStop hook and waiting for 15 seconds in the app are different.
The preStop hook is invoked before the SIGTERM is dispatched to the app.
So, while the preStop is running, the app isn't aware that it is about to shut down.
But there's more.
The delay in the preStop hook is part of the terminationGracePeriodSeconds 30-second budget.
If you preStop hook waits for 25 seconds, as soon as it completes:
- The container receives the
SIGTERM. - It has 5 seconds to terminate, or the kubelet will issue a
SIGKILL.
What happens when the preStop hook waits for longer than terminationGracePeriodSeconds 30 seconds?
The kubelet will send the SIGKILL signal and forcefully terminate the container — no SIGTERM signal is dispatched.
If you need a longer delay, consider adjusting the terminationGracePeriodSeconds to account for that.
 1/5
1/5You already know that when a Pod is deleted, the kubelet is notified of the change.
 2/5
2/5If the Pod has a
preStophook, it is invoked first. 3/5
3/5When the
preStopcompletes, the kubelet sends theSIGTERMsignal to the container. From that point, the container should close all long-lived connections and prepare to terminate. 4/5
4/5By default, the process has 30 seconds to exit, including the
preStophook. If the process isn't exited by then, the kubelet sends the SIGKILL signal and forces the process to be killed. 5/5
5/5The kubelet notifies the control plane that the Pod was deleted successfully.
So, what is the advice on the preHook or app delay? 15, 60, 120 seconds?
It depends.
If you are handling graceful shutdown in spot instances, your budget will likely be constrained to 60 seconds or less.
If your app has to flush logs or metrics before shutting down, you might need a longer interval.
In general, you want to keep your waiting time restricted to 30 seconds, as longer intervals have implications for resource utilization in the cluster.
Let's look at an example to illustrate the scenario.
Long graceful shutdowns and cluster autoscaling
Graceful shutdown applies to Pods being deleted.
But what if you don't delete the Pods?
Even if you don't, Kubernetes deletes Pods all the time.
In particular, Kubernetes creates and deletes Pods every time you deploy a newer version of your application.
When you change the image in your Deployment, Kubernetes rolls out the change incrementally.
pod.yaml
apiVersion: apps/v1
kind: Deployment
metadata:
  name: app
spec:
  replicas: 3
  selector:
    matchLabels:
      name: app
  template:
    metadata:
      labels:
        name: app
    spec:
      containers:
      - name: app
        # image: nginx:1.18 OLD
        image: nginx:1.19
        ports:
          - containerPort: 3000
      lifecycle:
        preStop:
          exec:
            command: ["sleep", "15"]
If you have three replicas and as soon as you submit the new YAML resources, Kubernetes:
- Creates a Pod with the new container image.
- Destroys an existing Pod.
- Waits for the Pod to be ready (i.e. a passing Readiness probe).
It repeats the steps above until all the Pods are migrated to the newer version.
Kubernetes repeats each cycle only after the new Pod is ready to receive traffic (in other words, it passes the Readiness check).
Does Kubernetes wait for the Pod to be deleted before moving to the next one?
No.
If you have 10 Pods and the Pod takes 2 seconds to be ready and 20 to shut down, this is what happens:
- The first Pod is created, and a previous Pod is terminated.
- The new Pod takes 2 seconds to be ready. After that, Kubernetes creates a new one.
- In the meantime, the Pod being terminated stays terminating for 20 seconds
After 20 seconds, all new Pods are live (10 Pods, Ready after 2 seconds), and all ten the previous Pods are terminating (the first Terminated Pod is about to exit).
You have double the number of pods for a short time (10 Running, 10 Terminating).

The longer the graceful period compared to the Readiness probe, the more Pods you will simultaneously have Running (and Terminating).
Is it bad?
That is not necessarily the case since you're careful not to drop connections.
But let's repeat the experiment with a longer termination of 120 seconds and 40 replicas.
pod.yaml
apiVersion: apps/v1
kind: Deployment
metadata:
  name: app
spec:
  replicas: 40
  selector:
    matchLabels:
      name: app
  template:
    metadata:
      labels:
        name: app
    spec:
      containers:
      - name: app
        # image: nginx:1.18 OLD
        image: nginx:1.19
        ports:
          - containerPort: 3000
      lifecycle:
        preStop:
          exec:
            command: ["sleep", "120"]
            terminationGracePeriodSeconds: 180
In this case, Kubernetes will complete the rollout, but you will have 80 replicas running for 120 seconds: 40 Running and 40 Terminating.
Since this is a non-trivial amount of replicas, it might trigger the cluster autoscaler and create new nodes.
The same nodes must be removed and the cluster downscaled when the 40 Terminating pods are removed.
If your graceful shutdown is quicker (i.e. less than 30 seconds), Terminating pods are deleted while new pods are created.
In other words, fewer pods are running at the same time.
But there's another reason to strive for a shorter, graceful shutdown, and it concerns endpoints.
If your app exposes a /metrics endpoint to collect metrics, the data is unlikely to be collected during the graceful shutdown.
Why?
Tools such as Prometheus rely on Endpoints to scrape Pods in your cluster.
However, as soon as you delete the Pod, the endpoint deletion is propagated throughout the cluster—even to Prometheus!
In other words, you should treat your graceful shutdown as an opportunity to terminate the pod as soon as possible rather than trying to extend its lifetime to complete the current task.
Graceful shutdown for long-lived connections and long-running tasks
If your application serves long-lived connections such as WebSockets, you don't want to terminate it within 30 seconds.
Instead, you might want to keep the connection running for as long as possible — ideally, until the client disconnects.
Similarly, if you are transcoding a large video, you don't want a rolling update to delete the current pod (and hours of work).
How can you avoid delaying shutting down the Pod?
You could increase the terminationGracePeriodSeconds to 3 hours in the hope that the connection will be drained by then or the job will be completed.
However, this has some drawbacks:
- You won't be able to collect metrics if you rely on Prometheus to scrape them (i.e., the endpoint is removed).
- Debugging is more challenging since the Running and Terminating pods may be on different versions.
- The kubelet doesn't check any probes (e.g. no liveness probe).
Instead of increasing the grace period, you should consider creating a new Deployment for every release.
When you create a brand new Deployment, the existing Deployment is left untouched.
The long-running jobs can continue processing the video as usual, and your long-lived connections will remain intact.
Once they are done, you can delete them manually.
If you wish to delete them automatically, consider setting up an autoscaler to scale your deployment to zero replicas when they run out of tasks.
An example of such Pod autoscaler is KEDA — the event-driven Kubernetes autoscaler.
The technique is sometimes referred to as Rainbow Deployments and is useful whenever you have to keep the previous Pods Running longer than the grace period.
Creating a new Deployment for every release is a less obvious but better choice.
Summary
You should pay attention to Pods being deleted from your cluster since their IP addresses might still be used to route traffic.
Instead of immediately shutting down your Pods, you should consider waiting a little longer in your application or setting up a preStop hook.
The Pod should be removed only after all the endpoints in the cluster are propagated and removed from kube-proxy, Ingress controllers, CoreDNS, etc.
You should consider using rainbow deployments if your Pods run long-lived tasks such as transcoding videos or serving real-time updates with WebSockets.
In rainbow deployments, you create a new Deployment for every release and delete the previous one when the connection (or the tasks) is drained.
You can manually remove the older deployments after the long-running task is completed.
Or you could automatically scale your deployment to zero replicas to automate the process.