
[Photo by Kelly Sikkema on Unsplash, modified (cropped)]
This article follows up on a discussion. Please share your experience there, I'd gladly hear about it!

Introduction
Some months ago I was surveying a little the state of GUI in Rust. Let me tell you, the quest has been horrible.
Starting off some searches on internet, apart some questions on Reddit and other sites, you get some (very old) articles.
Rust has always seemed super interesting to me since learning of its existence a few months ago. However one thing that turned me off at the time was the lack of (structured) GUI bindings for cross platform devices. But fast forward a few months, is there a good GUI library to use that can make “complex” applications? Or maybe a…
Old and stale.
The only guide you get at the end of the day (referenced by all) is the site Are We GUI Yet which is not helpful at all.
 areweguiyet
/
areweguiyet
areweguiyet
/
areweguiyet
A website built for the Rust community
Readme
Want to find crates for GUI in Rust? Then you've come to the right place!
Status
This site is maintained as best as possible. The next steps likely involve replacing it with an automated system more like lib.rs.
CI runs weekly to update crate information from crates.io, if it is not overriden by the crate's configuration in this repo.
What is this?
Companion website to arewegameyet arewewebyet, and arewelearningyet.
Contributing
To make it easy for people (hey, that's you!
The workflow:
- fork AreWeGuiYet
- clone your fork
-
cdto the CLI directory (cli) (it currently uses relative paths😬 ) - Build and run the CLI
- Usage:
cargo run -- [--clean] <command> [flags] - Help:
cargo run -- help
- Usage:
- When you're done…
It seems that AreWeGUIYet has not been updated since 2019, and the interface does not help in the least to search for a suitable library. The only tags it has is on the kind of implementations the crates have. Not many articles, not a useful tutorial, no understanding about the status of the crates that are showcased there.
Some featured crates seem pretty rough, some more advanced... but there's no way to know it other than trying each and every one.
Oh.
My.
And I did install some, but the results were a disaster, because at least the ones I tried sucked a lot.
Then, over the summer I found an article by boringcactus. They had much my same experience, but I realized that I actually managed to make many more things to work than they did...
Flash forward to early November. Here I was, trying again the old way. I was serious with my intention to try each and every crate in the list.
This time around I got even luckier. At least I did not only succeeded in make some libraries to work, I actually got material to write some tutorials to help others.
Here I'll wet your appetite: there's more to come!
Disclaimers
- I only tried the following on my Linux laptop: sorry, I do not own a Windows or a Mac!
- I usually employ
cargo addfrom cargo edit (to install it:cargo install cargo-edit), but you can add the dependency straight to Cargo.toml - I tried to make the crates work in every possible way, and I meant it. I even patched them locally, and even submitted some issues or even a PR. I wanted to honestly do my homework
Summary Table
Below a summary of the crates I tried, with the status I found them in:
| Status | Name | Notes | |
|---|---|---|---|
| Working | Druid | Review | It relies on piet 2D graphic library; on Linux that means GTK/Cairo 2D primitives |
| FLTK | Review | FLTK for Rust | |
| GTK+ | Review | Official GTK+ Rust support | |
| Iced | Review | Elm Inspired | |
| IUI | Review | Based on libui | |
| OrbTK | Review | Even if it is designed for Redox, it still works on other systems | |
| QMetaObject | Review | QT based: it relies heavily on QML | |
| Relm | Review | Elm-inspired, GTK improvement | |
| Sciter | Review | Bindings to Sciter, a commercial Library | |
| Tauri | Review | This is a different beast altogether: it transforms a web app to a desktop app, while adding the possibility to interface with Rust | |
| VGTK | Review | Built on top of GTK, and Elm-inspired | |
| Other/Could not try | Conrod | Review | The examples work. How to build a GUI is still a mystery though. |
| ImGui | Review | Same thing as Conrod, no way to understand how it works, besides the examples | |
| Core-Foundation | Review | Could not try: I do not have a Mac | |
| LittlevGL | Review | Could not try: it runs on embedded systems | |
| kas | Review | Could not try: I don't have Vulkan hardware, and the GTK backend is not working at all | |
| Not Working | Azul | Review | Based on WebRender. I tried many times over to make it work... It refuses! |
| QT_Widgets | Review | There's a small issue, but it does not work until it is solved |
There are also two entries that I excluded completely, because I do not think they belong to Rust GUIs: WebRender and Rust-QT-Binding-Generator. Tauri almost got kicked out as well, but it stayed in, since it is another beast altogether (because it is a bridge between technologies, more than between languages as Rust-QT-Binding-Generator is).
Working
Druid
One of the crates I could not make to work the first time around (I don't remember why), but in reality Druid works like a charm now.
It relies on piet which is a 2D graphic library. On Linux it wraps GTK3 and its cairo 2D primitives, so check out all the requirements needed on your distro.
It has also a web based render engine, and it uses wasm and wasm-pack.
Let's give it a try.
cargo new rust-ui-druid
cd rust-ui-druid
cargo add druid
Then we can set up our first app in src/main.rs:
use druid::widget::{Button, Flex, Label};
use druid::{AppLauncher, LocalizedString, PlatformError, Widget, WidgetExt, WindowDesc, Data};

#[derive(Clone, Data)]
struct Counter(i32);

fn main() -> Result<(), PlatformError> {
    // Window builder. We set title and size
    let main_window = WindowDesc::new(ui_builder)
        .title("Hello, Druid!")
        .window_size((200.0, 100.0));

    // Data to be used in the app (=state)
    let data: Counter = Counter(0);

    // Run the app
    AppLauncher::with_window(main_window)
        .use_simple_logger() // Neat!
        .launch(data)
}

fn ui_builder() -> impl Widget<Counter> {
    // The label text will be computed dynamically based on the current locale and count
    let text = LocalizedString::new("hello-counter")
        .with_arg("count", |data: &Counter, _env| (*data).0.into());
    let label = Label::new(text).padding(5.0).center();

    // Two buttons with on_click callback
    let button_plus = Button::new("+1")
        .on_click(|_ctx, data: &mut Counter, _env| (*data).0 += 1)
        .padding(5.0);
    let button_minus = Button::new("-1")
        .on_click(|_ctx, data: &mut Counter, _env| (*data).0 -= 1)
        .padding(5.0);

    // Container for the two buttons
    let flex = Flex::row()
        .with_child(button_plus)
        .with_spacer(1.0)
        .with_child(button_minus);

    // Container for the whole UI
    Flex::column()
        .with_child(label)
        .with_child(flex)
}
Druid is pretty data-driven, so you see that widgets implement data-types: they are not a type unto themselves. That explains why a Widget type has to be declared as Widget<T>. We notice also that Druid employs the constructor pattern a lot.
Code notes:
#[derive(Clone, Data)]
struct Counter(i32);
We create a custom data structure to employ as our app's state. It has to derive druid::Data.
fn main() has to return a Result<(), PlatformError>, because the AppLauncher might fail.
Inside main() we create a new main widow descriptor WindowDesc out of a widget we'll create with the function ui_builder(). We set title and state of the main window.
We init the custom state (Data in druid's jargon), and we pass the window and the state to the AppLauncher, which will manage the app's cycle for us.
Notice that Druid implements a simple logger to the stderr, which I think it's a neat function for debugging.
Inside the fn ui_builder() we first create a localized string (LocalizedString), which renders a translatable text. Also this is a neat function, to have localization embedded in the regular flow of development. We assign the "hello-counter" key to it; since this is bundled as a default (for example's purpose) the translation will be automatically created for us, according to the locale (by now only English, French and German). we assign this localized string to a label (we set the center position and a padding to it).
The we create two buttons, one to increase and the other to decrease our state counter, with a callback on the on_click() event. The state will be increased (decreased), and Druid will take care to update the interface to reflect the state for us (no need to signal to the label to update its text, it's Druid's duty... Very nice!)
We create a Flex which is a container, and we stack the two button horizontally, with a space in between.
Then we return another Flex where we stack vertically the label and the Flex that contains the buttons. This is the UI that our window descriptor takes as argument.
We can now run our first Druid application.

Example Repo:
davidedelpapa
/
rust-ui-druid
Rust UI Rundown: Druid
Code for part of rust-ui-rundown article.
FLTK
Next in the list is FLTK. The first time around, I admit that I didn't even consider it: having a little C/C++ background I have actually used FLTK sometime before and, let me tell you, it's quite "complicated", and with poor results. It is not feature filled as wxWidgets or QT (it's much more bare-bones actually), but still it manages to have a way in which you have to code that... ugh! Well, I didn't even consider it because of my negative experiences in the past. However, now I'm told that FLTK has come a long way since the times I was using it in C++, so this should teach me something about having prejudices.
In fact, this time I was going to try each crate in the list, and when the FLTK bindigs turn came, I was fully blown away by this crate as soon as I gave it a try: I fell in love with it! Somehow the author managed to take away the complexity of writing a FLTK interface, and made it Rust-y (read it with a sex-y voice please!). I mean, it feels as if it was only Rust, no bindings whatsoever involved. It clearly does not feel as a wrapper, around a FFI wrapper, around a C library (too many chinese boxes I reckon), as many crates that bind C libraries (try one of the QT crates and then come beck here imploring!).
Instead, it feels like true Rust native. In order to do so, sometimes it wraps around widgets in a different way than the underlying FLTK libs. But this is really nice, I found out.
Like Druid, FLTK employs the constructor pattern a lot.
As first thing, let's check (and in case, fix), FLTK's dependencies:
sudo apt-get install libx11-dev libxext-dev libxft-dev libxinerama-dev libxcursor-dev libxrender-dev libxfixes-dev libpango1.0-dev libgl1-mesa-dev libglu1-mesa-dev
Then, we can start a new project and declare FLTK dependency:
cargo new rust-ui-fltk
cd rust-ui-fltk
cargo add fltk
Let's take a look at the src/main.rs:
use fltk::{app::*, button::*, frame::*, window::*};

fn main() {
    let app = App::default();
    let mut wind = Window::new(100, 100, 400, 300, "Hello, FLTK!");
    let mut frame = Frame::new(0, 0, 400, 200, "Boring label");
    let mut but = Button::new(160, 210, 80, 40, "Click me!");

    wind.end();
    wind.show();

    // Remember: Callbacks after initializing the interface
    but.set_callback(move || frame.set_label("Hello, World!"));

    app.run().unwrap();
}
We set the App with it's defaults, then in order to start the Window, we specify X,Y position and width,height dimensions, plus the title; then we create a Frame (equivalent of FLTK Box), again with position and dimensions, plus a label; finally a button (pos., dim., label as well).
We did not employ the constructor pattern here, but we could have done the following with the button, for example:
let mut but = Button::default()
    .with_pos(160, 210)
    .with_size(80, 40)
    .with_label("Click me!");
Which is equivalent to the above Button::new(160, 210, 80, 40, "Click me!") initializing method.
Once the UI is done, we finalize the UI (with .end()), then we show the window(with .show()).
Callbacks are to be set once the UI is finalized; so we set a callback to the button (it gets called on the click event), and in its closure we change the label of the frame.
At the end we just run the app.
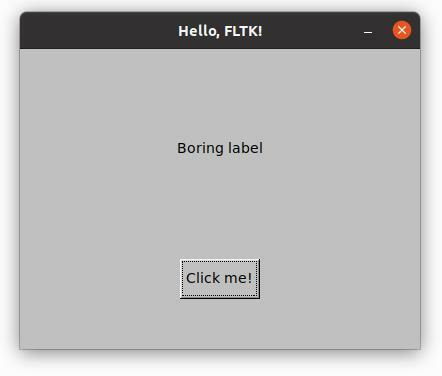
Maybe you didn't realize, but this is also maybe the simplest of the example here present, yet it is fully functional!
This crate is very promising: the author even manged to use it on the Android system.
Example Repo:
davidedelpapa
/
rust-ui-fltk
Rust UI Rundown: FLTK
Code for part of rust-ui-rundown article.
GTK
Official GTK bindings, this should be the go to crate for "serious" projects. That said, please be prepared for a non ergonomic experience. You know, this is a full featured crate, binding to one of the 3 most humongous GUI libraries out there, so it is totally fitting that it has some complexity, as the full control that it brings is much bigger than any "simplistic" other project.
In fact, there are other crates that bind to GTK, and they all try to simplify it, but at the expense of full control. It's just a trade off.
That said, I have to say, the Rust bindings to GTK are much more ergonomic than the C/C++/c#. I think there's something in Rust that makes many implementations much more ergonomic than their C counterpart. Don't expect the treats fltk provides though; let's say it's a gracious compromise.
The project gives also the possibility to use Glade and its XML based interface descriptor.
Time to start off:
cargo new rust-ui-gtk
cd rust-ui-gtk
cargo add gtk --features=v3_16
cargo add gio --features=v2_44
Now, let's write our src/main.rs
use gtk::prelude::*;
use gio::prelude::*;
use gtk::{Application, ApplicationWindow, Box, Button, Label};
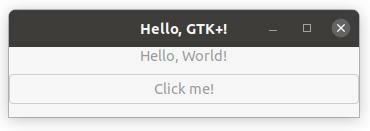
fn main() {
let application = Application::new(
Some("com.github.rust-ui-rundown.rust-ui-gtk"),
Default::default(),
).expect("failed to initialize GTK application");
application.connect_activate(|app| {
let window = ApplicationWindow::new(app);
window.set_title("Hello, GTK+!");
window.set_default_size(350, 70);
let container = Box::new(gtk::Orientation::Vertical, 10);
let label = Label::new(None);
let button = Button::with_label("Click me!");
container.add(&label);
container.add(&button);
window.add(&container);
button.connect_clicked(move |_| {
&label.set_label("Hello, World!");
});
window.show_all();
});
application.run(&[]);
}
We create first an Application. We have to pass to it an identifier (an Option wrapped str) and the application's flags. We are passing to it the default ones.
Next we apply the method connect_activate which creates the UI in a closure. In this closure we declare a window for the app (ApplicationWindow), setting title and default dimensions. Then we create a Box container with vertical orientation and spacing.
We set a label, with no text (with None) and a button. We add these to the container; then we add the container itself to the window.
Next, we declare a callback for our button, with a closure that sets the label text, once the button is clicked.
We end the closure of connect_activate() by showing all widgets. Finally, we run the application.
The program works as intended, and at this stage is not even much too complex to create simple GUIs like this.
Example Repo:
davidedelpapa
/
rust-ui-gtk
Rust UI Rundown: GTK
Code for part of rust-ui-rundown article.
Iced
A cross-platform, elm inspired framework, Iced is a good small solution. The Elm like architecture has been used in many Rust projects already (think Yew or Seed). Like Druid, Iced is data centered.
The first time around I could not make it run, because I do not have Vulkan (and I made a mess with some tricks trying to install it: I do not have a compatible hardware). Since then, though, Iced has got a new OpenGL back-end through glow; the problem is, it is not yet on the crates.io version, so I needed to add it thorugh the GitHub repo:
cargo new rust-ui-iced
cd rust-ui-iced
cargo add iced --git "https://github.com/hecrj/iced.git" --features glow
And now, let's head to the src/main.rs:
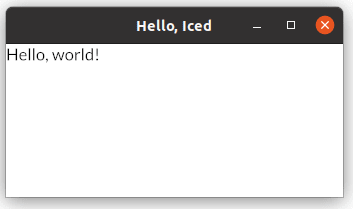
use iced::{Element, Sandbox, Settings, Text};

struct MyApp;

impl Sandbox for MyApp {
    type Message = ();

    fn new() -> Self {
        MyApp
    }

    fn title(&self) -> String {
        String::from("Hello, Iced")
    }

    fn update(&mut self, _message: Self::Message) {}

    fn view(&mut self) -> Element<Self::Message> {
        Text::new("Hello, world!").into()
    }
}

pub fn main() -> iced::Result {
    MyApp::run(Settings::default())
}
This example is a bit simplified. We need to declare a struct that we need to impl as an app. In this case it is a Sandboxed type of app, that is more simplified than a regular app (and with less customizing available).
The app has to impl several functions that will be called during the application cycle:
-
new()to init the app -
title()to assign its title (it can be dynamic: neat!) -
update()to check and react to the app messages (given by theMessagetype, but in this case its an empty object()). Here we have nothing to react to. -
view()to render the app graphics part (the UI), in this case a simple text that does nothing but stand still.
We init the App, running it on main() with the default options.
This is how it looks like when run.
Example Repo:
davidedelpapa
/
rust-ui-iced
Rust UI Rundown: Iced
Code for part of rust-ui-rundown article.
IUI
IUI is a cross platform wrapper for libui, which in turns uses native frameworks: the usual GTK+, cocoa, and Win32API.
It is a simple yet very usable framework, at least for small projects. Let's see it with an example.
cargo new rust-ui-iui
cd rust-ui-iui
cargo add iui
In the src/main.rs:
use iui::prelude::*;
use iui::controls::{Label, Button, VerticalBox};
use std::rc::Rc;
use std::cell::RefCell;

struct State {
    label: String,
}

fn main() {
    // Initialize the UI and State
    let ui = UI::init().expect("Couldn't initialize UI library");
    let state = Rc::new(RefCell::new(State { label: "".into() }));

    // Create a window into which controls can be placed
    let mut win = Window::new(&ui, "Hello, IUI!", 200, 100, WindowType::NoMenubar);

    // Create a vertical layout to hold the controls
    let mut vbox = VerticalBox::new(&ui);
    vbox.set_padded(&ui, true);

    // Create a new label.
    let label = Label::new(&ui, "");

    // Create a button and its callback
    let mut button = Button::new(&ui, "Click me!");
    button.on_clicked(&ui, {
        let state = state.clone();
        move |_| {
            state.borrow_mut().label = "Hello, world".to_owned();
        }
    });

    // Adding controls to the box, and box to window
    vbox.append(&ui, label.clone(), LayoutStrategy::Stretchy);
    vbox.append(&ui, button.clone(), LayoutStrategy::Compact);

    win.set_child(&ui, vbox);

    // Show the window
    win.show(&ui);

    // Run the application
    let mut event_loop = ui.event_loop();
    event_loop.on_tick(&ui, {
        let ui = ui.clone();
        let mut ui_label = label.clone();
        move || {
            let state = state.borrow();

            // Update all the labels
            ui_label.set_text(&ui, &format!("{}", state.label));
        }
    });
    event_loop.run(&ui);
}
We first define a struct to hold the global state, then initialize it as a RefCell, to clone safely.
We initialize a window, with some settings, and a vertical box. We then initialize two controls: a label and a button, with its callback. Once clicked, the button changes the global state, in order to update the text label.
We then add the controls to the layout, and the layout to the window. Up to this point it works mostly as any other UI framework
When running the app, there's a little difference: we have to manage the refreshes with the on_tick() callback in the event loop.
It is conceptually similar to the MVC pattern, however, we insert our logic inside the event loop itself. This means we have to centralize all the updating of the app in one function.
This means that in order to decouple the refresh from the cycle we would need to create a function for each component, then call it in sequence in the event loop on_tick.
This is not a problem per se, but it must be considered when architecting the apps.

On the general side, I find IUI quite simple, yet usable. It is a pity that its development seems halted. EDIT: Good news! As you can see in the comments, the development on this library has not halted at all, it was just slowed down by the underlying C lib.
Example Repo:
davidedelpapa
/
rust-ui-iui
Rust UI Rundown: IUI
Code for part of rust-ui-rundown article.
OrbTK
orbtk is the base of the Redox Operative System widgets. It can be used also on other systems (even Android is on the plate, but the support is not yet completed).
I do not know if it's my configuration, but sometimes it feels slow. Compilation too takes a long time, even for small changes, and it seems it recompiles quite few things every time.
Remember to install xkb and wayland as dependencies:
sudo apt install libxkbcommon-dev libwayland-dev
Let's get down to business.
cargo new rust-ui-orbtk
cd rust-ui-orbtk
cargo add orbtk --git="https://github.com/redox-os/orbtk.git" --branch develop
As for the src/main.rs:
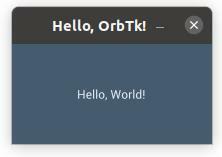
use orbtk::prelude::*;

fn main() {
    orbtk::initialize();

    Application::new()
    .window(|ctx| {
        Window::new()
            .title("Hello, OrbTk!")
            .position((100.0, 100.0))
            .size(200.0, 100.0)
            .child(
                TextBlock::new()
                    .text("Hello, World!")
                    .v_align("center")
                    .h_align("center")
                    .build(ctx)
            )
            .build(ctx)
    })
    .run();
}
It is a very small example:
- first we initialize the
orbtk - then we create a new
Application, and we build its window; - the
windowmethod gets a closure to which the context gets passed on. Inside it we create aWindow, again with a builder pattern. - for the new window we set some properties, like title, size, and position, and we declare a
TextBlockas its child - the
TextBlockis build with a builder pattern as well, setting the alignment (vertical and horizontal) inside the container, and its text - both
TextBlockandWindowtake the context as parameter of thebuild()method, that init the widget. - the
Application, which is the top-level "container", and provides the context for the contained widgets, uses arun()method, instead, in order to build and run.
Example Repo:
davidedelpapa
/
rust-ui-orbtk
Rust UI Rundown: OrbTK
Code for part of rust-ui-rundown article.
QMetaObject
QMetaObject relies on the QT Widgets, and it is written in order to support directly the QML interface language, that is a JSON like declarative language, with some JavaScript like constructs.
Needless to say, QT Widgets must be installed. But first, we need some libraries installed as well (if you do not have them already):
sudo apt install libclang-dev libsqlite3-dev
apt-get install libllvm-11-ocaml-dev libllvm11 llvm-11 llvm-11-dev llvm-11-doc llvm-11-examples llvm-11-runtime
Now we need also QT:
Download the open source versions from the QT Download Page: in the next page scroll down and Download the QT Online Installer.
Once downloaded you have to execute the script:
./qt-unified-linux-x64-4.0.1-online.run
Please install a Desktop setting.
After this, we need to export the paths:
export PATH="~/Qt/5.15.2/gcc_64/bin:$PATH"
export LD_LIBRARY_PATH="~/Qt/5.15.2/gcc_64/lib:$LD_LIBRARY_PATH"
Substitute the 5.15.2 with your actual version.
Now we can pass to the Rust side.
cargo new rust-ui-qmetaobject
cd rust-ui-qmetaobject
cargo add qmetaobject
We can now see an example main.rs adapted from the repo's README (adapted to use standard CStr actually):
use std::ffi::CStr;
use qmetaobject::*;

#[allow(non_snake_case)]
#[derive(Default, QObject)]
struct Greeter {
    base : qt_base_class!(trait QObject),
    name : qt_property!(QString; NOTIFY name_changed),
    name_changed : qt_signal!(),
    compute_greetings : qt_method!(fn compute_greetings(&self, verb : String) -> QString {
        return (verb + " " + &self.name.to_string()).into()
    })
}

fn main() {
    qml_register_type::<Greeter>(
        CStr::from_bytes_with_nul(b"Greeter\0").unwrap(),
        1,
        0,
        CStr::from_bytes_with_nul(b"Greeter\0").unwrap()
    );
    let mut engine = QmlEngine::new();
    engine.load_data(r#"
        import QtQuick 2.6; import QtQuick.Window 2.0;
        import Greeter 1.0
        Window {
            visible: true;
            title: "Hello, QMetaObject";
            Greeter { id: greeter; name: 'World'; }
            Text { anchors.centerIn: parent; text: greeter.compute_greetings('hello'); }
        }
    "#.into());
    engine.exec();
}
In the above we create a custom class to "implement" a C++ QObject. Of course a Rust struct cannot implement a C++ object, so in order for it to work, QMetaObject needs you to derive QObject, and then specify in the base field the C++ class to inherit from, with the macro qt_base_class!(trait QObject).
In the struct you can then add any custom field, besides a name that is the means by which the class can be render visible to the underlying C++.
In this case we added a compute_greetings which is rendered as a QT Method with the macro qt_method!() which takes a closure.
In main() we need to register our custom struct with qml_register_type which takes a uri, a version major and minor (in this case 1.0 therefore 1,0), and the name of the object (the version is needed in QML). Both uri and name have to be passed as C strings, in this case using std::ffi::CStr and the method from_bytes_with_nul; the null terminating the string (totally FFI C++ style) is rendered with \0.
Now the object is available in QML, and we can refer to it by the selected name and version (Greeter 1.0 in this case).
We can create a QmlEngine and load the QML either as a string or as a file (in our case a Rust literal string with #" ... "#). As you can see we use our Greeter and its method compute_greetings inside the QML.
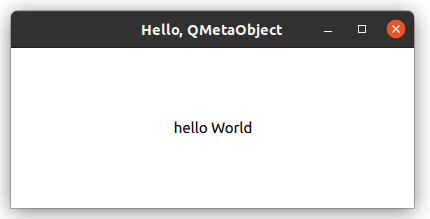
Example Repo:
davidedelpapa
/
rust-ui-qmetaobject
Rust UI Rundown: QMetaObject
Code for part of rust-ui-rundown article.
Relm
A framework that aims to simplify GTK and give it a behaviour like Elm. Check gtk-rs requirements/dependencies.
In reality it does not simplify GTK, it just renders it elm-like. In fact, you need to know how to design UIs with gtk in order to use Relm. A nice thing is that Relm can use the Glade interface and descriptor as well. Another good perk is that in the examples it shows clearly how to test the interface, not a thing to underestimate!
cargo new rust-ui-relm
cd rust-ui-relm
cargo add relm relm-derive gtk
Onto src/main.rs now:
use gtk::{ Button, ButtonExt, ContainerExt, Inhibit, Label, LabelExt, Orientation, WidgetExt, Window, WindowType};
use relm::{connect, Relm, Update, Widget};
use relm_derive::Msg;

struct Model {}

#[derive(Msg)]
enum Msg {
    Hello,
    Quit,
}

#[derive(Clone)]
struct Widgets {
    lbl: Label,
    but: Button,
    window: Window,
}

#[allow(dead_code)]
struct Win {
    model: Model,
    widgets: Widgets,
}

impl Update for Win {
    type Model = Model;
    type ModelParam = ();
    type Msg = Msg;

    fn model(_: &Relm<Self>, _: ()) -> Model {
        Model {}
    }

    fn update(&mut self, event: Msg) {
        let label = &self.widgets.lbl;
        match event {
            Msg::Hello => { label.set_text("Hello, World!"); },
            Msg::Quit => gtk::main_quit(),
        }
    }
}

impl Widget for Win {
    type Root = Window;

    fn root(&self) -> Self::Root {
        self.widgets.window.clone()
    }

    fn view(relm: &Relm<Self>, model: Self::Model) -> Self {
        // Create the view using the normal GTK+ method calls.
        let window = Window::new(WindowType::Toplevel);

        let lbl = Label::new(None);
        let but = Button::with_label("Click Me");

        let vbox = gtk::Box::new(Orientation::Vertical, 0);
        vbox.add(&lbl);
        vbox.add(&but);

        window.add(&vbox);
        window.show_all();

        connect!(relm, but, connect_clicked(_), Msg::Hello);
        connect!(relm, window, connect_delete_event(_, _), return (Some(Msg::Quit), Inhibit(false)));

        Win {
            model,
            widgets: Widgets {
                lbl,
                but,
                window,
            },
        }
    }
}

fn main() {
    Win::run(()).expect("Win::run failed");
}
As you can see from the use section, gtk is not really hidden behind Relm with wrappers, but is forefront.
We need four data structures:
- a
structfor theModel, that holds the App's state (none in this case) - a
enumMsgfor the messages (callbacks), for which we deriverelm_derive::Msg - a
structWidgtsto hold the widgets list (we need to allow dead code, because we are not using the Model, as it has no state) - a struct
Winfor the main window (it holds the Model and the widgets)
For Win we impl the Update cycle, setting the model() function to create the model, and the update() function to set the behavior for each message (we match over the two messages, assigning the gtk::main_quit() when the message to Quit is fired, and setting the label's text when the Hello message is fired).
We need to impl also the Widget for our Win, setting the type of the root window (in this case single window gtk::Window). The root() function is needed to init the root window, while the view() function draws the UI, using the gtk widgets and conventions.
fn view() has to return the Widget struct initialized. We start declaring a gtk::WindowType::Toplevel window. Then we declare a label (with text = None) and a button.
We create a container and place the label and button in it, and then we place the container as the root widget of the window.
After showing the window (window.show_all()), we can set the callbacks, using the interesting Relm macro connect!. We connect the quit message of the window to the Msg::Quit, and the click of the button to the Msg::Hello.
After running the app, we have our window showing.
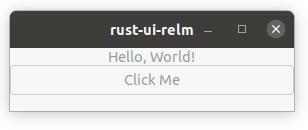
You can notice that the interface is quite similar to that of the base GTK app.
Example Repo:
davidedelpapa
/
rust-ui-relm
Rust UI Rundown: Relm
Code for part of rust-ui-rundown article.
Sciter
Sciter is a C-API commercial library (by Terra Informatica) used to create UIs based on web technologies. It has (amongst many others) a Rust binding, sciter-rs. There is a freeware version that we can use, and it seems that it is possible to use it also in commercial software. The only clause is to include somewhere, maybe in an about section, the following:
This Application (or Component) uses Sciter Engine (http://sciter.com/), copyright Terra Informatica Software, Inc.
The other caveat is that the executable may send diagnostic data to one of Terra Informatica 's servers. They are very clear that it may, and maybe (for what I read) it's just diagnostic (it should not infringe the EU protection laws in matters of personal data...). Anyway, the important thing is that you are aware.
By the way, between September and Octobr 2020 the author has campaigned on Kikstarter in order to raise funds to open-source the project. The campaign ended and the goal was not reached, but the author started to disclose some part of the code replacing the Javascript engine, with a BSD 3-clause license, found on github.com/c-smile/sciter-js-sdk. It seems all very promising.
Let's get down to business...
First we need to download the sdk from the sdk download page and extract it. Let's copy in a folder accessible in your PATH the libsciter-gtk.so found in bin.lnx/x64.
If it's not installed we need to install the GTK development files as well
sudo apt-get install libgtk-3-dev
And now, for the Rust part.
cargo new rust-ui-sciter
cd rust-ui-sciter
cargo add sciter-rs
Now for our src/main.rs:
use std::fs;
use std::path::PathBuf;

use sciter;

fn main() {
    let mut frame = sciter::Window::new();
    let html_file_path = PathBuf::from("./app.html");
    let html_file = fs::canonicalize(&html_file_path).unwrap();

    frame.load_file(html_file.to_str().unwrap());
    frame.run_app();
}
Notes:
- We create a new Window frame with
sciter::Window::new(); - in order to use the
.load_file()we have to pass to it the absolute path of the file.htmlto load (or a URL of an online resource). That is why we went to some lenghts to get aPathBufandcanonicalizeit. - At the end we just run the app with
run_app()
Let's see the content of app.html (to be put at the root of the project):
<html>
  <head>
    <title>Hello, Sciter</title>

    <script type="text/tiscript">
      $(button#click).on("click", function() {
        $(h1#label).$append("Hello, world");
      });
    </script>
  </head>
  <body>

    <h1 #label></h1>
    <button #click>Click me!</button>

  </body>
</html>
It is easy enough. By the way, we did not explore the interoperability between Rust and the HTML, and the TIscript (the Javascript used in Sciter), but of course it is possible (just a little more complex)

Example Repo:
davidedelpapa
/
rust-ui-sciter
Rust UI Rundown: Sciter
Code for part of rust-ui-rundown article.
Tauri
Getting into some heavy bindings (hevier maybe than even Sciter). Tauri lets you give a Desktop GUI to a web based project (HTML, CSS, and Javascript). What is it doing in this list, then? Legitimate question, and in fact I was tempted to kick it out, just like Rust-QT-Binding-Generator. However, there are two considerations in order here:
- Tauri bridges the web world to the desktop using Rust, and in fact it allows to use the JavaScript just to give the Graphical side of GUI (exactly as Rust-QT-Binding-Generator uses QML, and this one stayed in the list)
- Tauri bridges two technologies, web and desktop, with Rust as the man-in-the-middle (no security theats involved... maybe!). And since Rust has a good permeation inside the web world with WASM, indeed you start to see how Tauri can be beneficial in its own right as a GUI option (Tauri works well also with Yew, and the likes of it, meaning there can be more than one level of Rust integration)
We'll use Tauri in conjunction with Vue, so you have to have a node/npm/yarn environment first.
EDIT: nodejs is not required per se for the project to be ported (it could be just HTML/CSS/JS), but for now it is needed for the CLI, and in future release there's a plan to provide also a pure Rust CLI.
If you do not have already the Vue cli installed:
yarn global add @vue/cli @vue/cli-service-global
Now let's install also the Rust counterpart:
cargo install tauri-bundler
And finally let's create our project (with Vue this time!!!)
vue create rust-ui-tauri
cd rust-ui-tauri
vue add tauri
With vue add tauri we take care of the Rust part of the project. Wee have to answer some questions like app name (you can leave the default), and Window title.
Then we can test everything with:
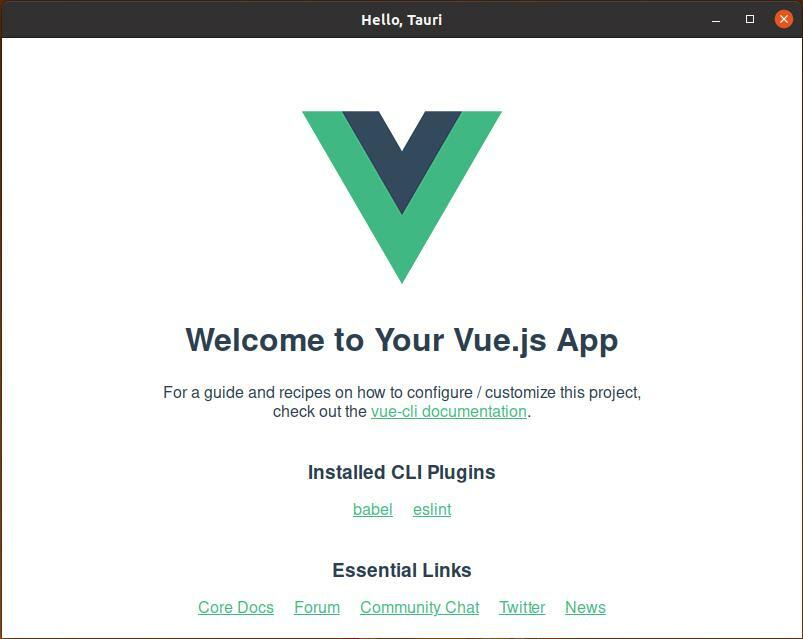
yarn tauri:serve
We will see the default Vue homepage, inside a desktop window!
Now let's write some code, shall we?
Vue Side
src/ is taken by Vue, while src-tauri/ is the Rust root.
In src/components/ we add another .vue file besides HelloWorld.vue which is already there. We call it RustButton.vue:
<template>
    <div>
        <h1>{{ msg }}</h1>
        <button @click="call_rust">
            Click Me!
        </button>
    </div>
</template>
<script>
import { promisified } from 'tauri/api/tauri'
export default {
  name: 'RustButton',
  methods: {
    call_rust() {
        promisified({
            cmd: 'getResponse',
            payload: {
                state: 1
            }
        }).then(response => {
            // do something with the Ok() response
            const { message } = response;
            this.msg_set = message;
        }).catch(error => {
            // do something with the Err() string
            console.log(error);
        })
        console.log('Rust invoked with Promisified!');
    }
  },
  data: function () {
    return {
      msg: ''
    }
  },
  computed: {
    msg_set: {
        set: function (newValue) {
        this.msg = newValue
        },
        get: function () {
            return this.msg
        },
    }
  }
};
</script>
There could be an optional <style> part, but we do not care for this example.
The <template> contains the rendered part, the <script> the logic.
In the <template> we set an <h1> that will display a variable's value (double brackets as handlebars). We have also a button with the @click property that will cull a custom function.
In the <script> part we import promisified from tauri to use the interface with Rust, and we export a default object with the custom method call_rust() which is called by the button. This method in turn calls a Rust function getResponse with a payload object (it is there just to show the interaction between Rust and JS). This is achieved with promisified which returns a JS promise that we can consume with .then() (setting the msg data to the response of Rust with a custom computed setter). This will be called when the Rust answer comes, only if the answer is a Result::Ok; if it is a Result::Err we can catch the error with .catch().
As you can see this is a one-to-one match of a Rust function that returns a Result<T, E>. T must be serialized, while Tauri takes care of the error with the crate anyhow (for which we will implement a custom error, just because...)
There's also another JS function that can call Rust, invoke, but is more suitable for a one-way communication with Rust.
As for the rest of Vue, we just need to modify src/App.vue to call our custom component:
<template>
  <div id="app">
    <img alt="Vue logo" src="./assets/logo.png">
    <br />
    <RustButton msg=""/>
  </div>
</template>

<script>
import RustButton from './components/RustButton.vue'

export default {
  name: 'App',
  components: {
    RustButton
  }
}
</script>
The <style> part we can leave as is.
In practice in the <template>, instead of calling <HelloWorld> we call our custom component <RustButton> with an empty msg property. We need to import it in the </script>, of course, and export it as a custom component in the default object.
And with this we took care of the Vue side.
Rust Side
The Rust side of the force is very strong, as usual... sorry, I mean: it's easy to set everything since Tauri already did some scaffolding for us.
Inside src-tauri we have the usual Rust crate root, with Cargo.toml, the .lock, even a rustfmt.toml (I set the indentation to 4 spaces instead of the default 2, :-) )
There's also a configuration file for Tauri in json.
What we are interested in is the src/cmd.rs. Here we need to put some custom data structures to interface with JS, namely the Cmd itself (which is an enum), that declares the data for our custom function getResponse that we set in JS, with payload, callback, and error. We have also to declare the struct Response to be sent to JS, and a struct representing the payload, which has to mimick the data we get from JS.
We'll use serde, that is already set as dependency in the Cargo.toml
use serde::{Deserialize, Serialize};

#[derive(Deserialize)]
pub struct GetResponsePayload {
    pub state: u64,
}

#[derive(Deserialize)]
#[serde(tag = "cmd", rename_all = "camelCase")]
pub enum Cmd {
    GetResponse {
        payload: GetResponsePayload,
        callback: String,
        error: String,
    },
}

#[derive(Serialize)]
pub struct Response<'a> {
    pub message: &'a str,
}
In main.rs we define a custom Error type (that's just boilerplate). We are more interested in the main() function:
fn main() {
    tauri::AppBuilder::new()
        .invoke_handler(|_webview, arg| {
            use cmd::Cmd::*;
            match serde_json::from_str(arg) {
                Err(e) => Err(e.to_string()),
                Ok(command) => {
                    match command {
                        // definitions for your custom commands from Cmd here
                        GetResponse {
                            payload,
                            callback,
                            error,
                        } => tauri::execute_promise(
                            _webview,
                            move || {
                                if payload.state != 0 {
                                    let response = cmd::Response {
                                        message: "Hello, World!",
                                    };
                                    Ok(response)
                                } else {
                                    Err(CommandError::new("State not OK").into())
                                }
                            },
                            callback,
                            error,
                        ),
                    }
                    Ok(())
                }
            }
        })
        .build()
        .run();
}
We build a Tauri App, with the builder pattern, then we use a closure to manage the interface with JS, using invoke_handler(), before build() and run().
Inside the closure we convert the json object handler and match over it: if it is Ok we match the command to see which one we got (there can be more than one invoked by the JS of course).
If it is our GetResponse, we execute the promise, that is, we send back the answer. I put an if guard on the state that we got from JS, just to show the interaction...
Now everything is set, we can proudly run our app:

Example Repo:
davidedelpapa
/
rust-ui-tauri
Rust UI Rundown: Tauri
Code for part of rust-ui-rundown article.
VGTK
VGTK: built on GTK and gtk-rs, above in the list, inspired by Elm, and its inspired Rust counterparts, with a virtualDOM of sorts, like React, and with a sort of JSX for Rust interfaces... Lots to take in at a first date... Ok let's go in to this blind date, and see if it's a love at first glance or not... or maybe if it will become a steady friendhip, why not?
We need, as for the other GTK based frameworks, a working GTK environment.
cargo new rust-ui-vgtk
cd rust-ui-vgtk
cargo add vgtk --git=https://github.com/bodil/vgtk
If we tried now to build a project from crates.io version, we would have some weird compilation error. The point is, something strange happened with gdk-pixbuf version "0.9.0", which is referenced to by vgtk "0.3.0" in crates.io. Instead, upon compilation from GitHub, those problems disappear. The only thing is that the compilations times are larger... It seems to be something connected to compiling by default also the docs, but I didn't have time to check it out better.
And now, let's take a look at our src/main.rs:
use vgtk::ext::*;
use vgtk::lib::gio::ApplicationFlags;
use vgtk::lib::gtk::*;
use vgtk::{gtk, run, Component, UpdateAction, VNode};

#[derive(Clone, Debug, Default)]
struct Model {
    msg: String,
}

#[derive(Clone, Debug)]
enum Message {
    Exit,
    UpdateLabel,
}

impl Component for Model {
    type Message = Message;
    type Properties = ();

    fn update(&mut self, msg: Self::Message) -> UpdateAction<Self> {
        match msg {
            Message::Exit => {
                vgtk::quit();
                UpdateAction::None
            },
            Message::UpdateLabel => {
                self.msg = "Hello, world!".to_owned();
                UpdateAction::Render
            }
        }
    }

    fn view(&self) -> VNode<Model> {
        gtk! {
            <Application::new_unwrap(Some("com.example.rustuivgtk"), ApplicationFlags::empty())>
                <Window border_width=20 on destroy=|_| Message::Exit>
                    <HeaderBar title="Hello VGTK!" show_close_button=true />
                        <Box spacing=10 orientation=Orientation::Vertical >
                            <Label label=self.msg.clone() />
                            <Button label="Click Me!" on clicked=|_| Message::UpdateLabel />
                        </Box>
                </Window>
            </Application>
        }
    }
}

fn main() {
    std::process::exit(run::<Model>());
}
To be honest, according to me it reminds of a fusion between VUE and Yew..., VUE for the code organization, and Yew (inspired by Elm in this) for the pretty recognizable MVC pattern (which is not a classic MVC, there's something peculiar to this that I can't put my finger on... yet).
As for the code, it is simple enough:
We have to build a model and a message system, as usual in these Elm-inspired frameworks; then we need to implement a model with an update() function to handle the messages, and a view() function to render the interface.
The model derives Default, so there's no need for initialization (which would get much more verbose).
The view() employs the macro gtk! which is like JSX, but for GTK interfaces.
The result, for you:

All in all it's not bad, the structure is clean enough, and the handling of the gtk! is neat: it seems really to be in a web based environment, and the limited testing I have done show that the framework is powerful enough. I will definitely go deeper with this framework.
Example Repo:
davidedelpapa
/
rust-ui-vgtk
Rust UI Rundown: VGTK
Code for part of rust-ui-rundown article.
Not working at all!
Azul
Azul: there was a broken dependencies. This crates is being developed, slowly so the bug might me fixed any time soon. Still, right now it is very promising, but unusable.
QT_Widgets
QT_Widgets is a Rust Qt binder from Ritual, a C++ to Rust wrapping project. Not too well documented, it is a series of unsafe wrappers for the various C++ QT libraries.
I tried to make it work in a few ways, I even submitted an issue and a pull request for a bug, but as is the crate is not working. Maybe the situation will change, and I'll inform you soon.
Other Issues
In fairness I have collected here some other crates that I didn't even try or that I tried but have some other issues:
Don't belong to the list according to me
Maybe I am a little too opinionated, but still:
Rust-QT-Binding-Generator
Rust-QT-Binding-Generator: it creates bindings for Rust and QT so that you can call Rust code from inside a QT interface.
The homepage says "it helps to create a Qt based GUI on top of Rust code". In reality it is not the case that you can use QT from a Rust program, but instead you have to write a QT program (in C++ and/or QML) and import the Rust code.
No way I am considering this as a Rust GUI project. It is useful in its own right, but not as a Rust GUI.
WebRender
The folks at AreWeGuiYet put in the list also WebRender.
This does not belong to a GUI framework list, sorry: it is very low level! At this point we should add also the bindings for GDK, Cairo, etc...
In this I disagree: it is true you can render a GUI with WebRender (as you could with the bare cairo bindings, why not?), but this does not mean WebRender is a GUI framework.
Immediate Mode "GUIs"
I have found a lot of immediate mode GUIs, which I purposely took out of the list: immediate mode GUIs belong to the gaming world, not to the Desktop Applications world.
Unless you have done a GUI in Blender's Style, that is useful also outside the realm of Graphics... at this point, let's discuss about it!
Here I present the two most used (and that are present in AreWeGUIYet, but shouldn't):
Conrod
Conrod is tied to the Piston Game Engine. Indeed it is its conception of User Interface.
There's often some dependency issue with XCB, needed by the xcb crate. In that case, you might need some or all of the following:
sudo apt-get install xcb xcb-proto libxcb-xkb-dev x11-xkb-utils libx11-xcb-dev libxcb-xrm-dev libxcb1-dev libxkbcommon-dev  libxcb-keysyms1-dev libxcb-xrm0 libxcb-shape0-dev\
libxcb-util0-dev libxcb-cursor-dev  libxkbcommon-x11-dev libxcb-xfixes0-dev
Just check what the linker complains about (remember to take off the initial "l"; so if it's "-lxcb-shape: missing", you know you need xcb-shape, found in libxcb-shape0-dev, etc...)
What works: the examples
git clone https://github.com/PistonDevelopers/conrod.git
cd conrod
cargo run --release --example all_winit_glium
The examples are found in conrod/backends/conrod_glium/examples take a look there if you are interested.
What does not work: making a simple UI by yourself.
Now, I could not reproduce any of the examples and modify it: all the examples depend on some other module that is in there, with no explanation.
There's also an unfinished official guide, but I found myself at loss nevertheless.
There is not a single/simple way of understanding what is going on, what we are required to do, and most of all, why.
What can I say? Maybe if you are in the know about Piston you swim easily in Conrod, but otherwise it seems just mumbo-jumbo to me.
ImGui
imgui is a Rust binding for Dear ImGui... Oh, dear! This is the same blessed way of doing things as Conrod: a lot of boilerplate inside a folder in the examples, that even if you copy it to your own project doesn't work!
Why, I say, why don't they make all the support boilerplate inside of the project? why a stupid folder in the examples? Is it too much to ask for a working minimal example when you are just learning about a new library?
Anyway, the working examples are as follows:
git clone https://github.com/Gekkio/imgui-rs
cd imgui-rs
git submodule update --init --recursive
cd imgui-examples
cargo test
cargo run --example hello_world
cargo run --example test_window
The state of these projects is a pity, but I wonder: there are 70 contributors to this package, and the GitHub repo has 1.1k stars.
Can anybody make a stupid example, a tutorial, something for the rest of us? Please! Searching online gets results dated 2018 at best, on stuff I could not try, or even some 404 errors!!!
I would expect something, even minimal, to grasp at, from a project with 1.1k stars!
Could Not Try: Core-Foundation
Maybe it's the best tool around in the Mac world, I don't know, but I could not try Core-Foundation, because I do not own a Mac.
Could Not Try: LittlevGL
This one is different: LittlevGL runs on embedded systems. I could not try it, but I look forward to get a Raspberry o something similar, and play a little with Rust in embedded systems.
Could Not Try: KAS
I tried with the GTK back-end, which is not working at all, but the main KAS crate employs Vulkan, for which I do not have any compatible hardware...
I could not try it out, sorry.
Currently, KAS's only drawing method is WebGPU which requires DirectX 11/12, Vulkan or Metal. In the future, there may be support for OpenGL and software rendering.
I do not have hardware support for vulkan. I tryed the GTK backend enabling Rust nightly (rustup override set nightly in the project root folder). Sadly it didn't work
Compiling kas-gtk v0.0.2
error[E0635]: unknown feature `const_vec_new`
 --> /home/<*>/.cargo/registry/src/github.com-1ecc6299db9ec823/kas-gtk-0.0.2/src/lib.rs:8:12
  |
8 | #![feature(const_vec_new)]
  |            ^^^^^^^^^^^^^

error: aborting due to previous error
I hope to see improvements on the GTK back-end, so that at least I can try it on my machine (or to see an improvement in my salary in order to start owning better machines... but I do not think that is coming around any time soon).
Conclusions
I tried over the past three months a lot of different crates. Right before publishing I even made sure they are all working properly.
Some crates do work, some crated do not. In my opinion, those who work should be merit-signalled, those who don't should be helped to get to a minimal usable product.
It is a shame that in the Rust ecosystem the GUI world is so mistreated. Granted, even in other languages the situation is not simple at all, but if Rust wants to take a spot out of the niche, as a mainstream language, curating the GUI state would be largely profitable.
Hope this little work of mine can help you getting your hands dirty with Rust GUI programming.
'Till next time!


Top comments (49)
Just a headsup - Tauri does NOT ship with a nodejs backend. You may sideload a nodejs based binary, but in its normal (and recommended shape), it is a 100% rust backend and HTML/CSS/JS shipped to the frontend.
I think maybe the clarification needed is that you MAY use a nodejs based harness for building your distributables (like vue, svelte, etc.) but that is not required. At the moment we are still using nodejs to run the HMR server and rig cargo for building the final app, but we are planning on releasing a pure rust version of the CLI and are looking into actually making a pure binary CLI / Bundler... At any rate - thanks for the great article!
Hi! First of all, thanks a lot for the good job on Tauri!
I edited the article reflecting your comment. Really thanks again to you and all the people behind this software. We need more of this in the Rust community: projects well thought of, and that run out of the box.
Keep up with the good job!
Thankyou!
Is there a tutorial that shows how to sideload a nodejs backend? I want to build a desktop application that uses a biometric fingerprint sensor. The company does not have an sdk for rust but they have one for JS. The other things is I'm not too good at Rust. I can do well with JS though.
Hi,
I made Taurine for the same reason. I can be more productive in nodejs than in rust. Here is a link to how to make a bundle of your code and nodejs into a single executable binary and run it as a sidecar: github.com/marcincodes/taurine
Also, I wrote a post with more explanation and rationale behind it: marcin.page/posts/tauri-+-nodejs:-...
@davidedelpapa Thank you for the awesome research. I would like to ask you which of the above GUI libraries produce the smallest binary, because this is also a necessary information to know. For example the Iced example of yours produced a 213MB binary on my system, and the Druid one is 115.8MB.
It would be interesting to have this information as well. Thank you so much for this work.
I think the sizes you are getting are due also to the fact that if you just 'cargo build', you get a debuggable executable. If you 'cargo build --release' you should get smaller bins.
Anyway, yes final size is a valuable metric. I'm planning a retake on this, also because some crates have evolved quite a bit since I tested them, and some are finally usable (yeah). In tht case I will try to spend two words about binary size
Wow... hundreds of Mb. This may discourage me to use Rust for desktop GUI.
I am considering to relearn C++ and use Qt.
Java is the other option with Swing already provided in the JDK.
Another very good option is C#. But it requires .Net framework, because the last time I read, .Net Core didn't provide support for Win Forms, WCF, WPF. Besides, C# + .Net are massive technologies that will take longer time to learn and get proficient.
That being said, I still want to continue learning Rust for other purpose, probably for web backend.
I think you missed Davide's comment below. Actually the binary became quite small when I used
cargo build --releaseto build it. So, my comment above is not accurate any more.You are right. Without including debugging feature, by adding --release option, the size would decrease much smaller.
But, when I build and compared two simple button apps, I got the result :
Hi! I am the developer of IUI (libui wrapper). You mentioned that development was halted - this is because most of the improvements I want for the next version are not possible until libui, the underlying C library that interfaces with OS components, fixes some serious design issues. I am confident that this will happen and as soon as it does I will update the IUI wrapper code.
Hi! First of all, thanks a lot for the good job on this library! It is an enrichment for the whole Rust community.
I edited the article reflecting your comment.
Absurdly well done.
Wonderful article.
I completely agree with your conclusion: in this world full of electron app, having a solid rust GUI ecosystem would be wonderful.
Could you elaborate on this? I'm part of neither of those communities, but I like to better understand your statement.
Immediate GUIs are repainted at each frame, meaning it's a waste of resources for desktop applications, as desktop GUIs don't update very often
That's not true. You can decide when to update the frame (e.g. an input event coming in). What is true is that usually the whole UI is repainted when a change does happen.
The author is absolutely wrong about ImGUI belonging to the gaming world. I have written a complete Unity-style editor using ImGUI and it was the best decision I ever made. I had to solve some issues such as layout and drag'n'drop with some custom code, but when this had been done, writing UIs and maintaining them became MUCH easier than more traditional widget-based approaches. You are liberated when you don't have to worry about lifetimes in a very dynamic environment.
Also, the author doesn't understand really what ImGUI is. It's sole purpose is to return vertex buffers and commands for the host to render. As a result, there is a lot of boilerplate to set that up. But ImGUI has many examples that implement a host using DirectX, OpenGL and others. You have to write it once and then you're done.
Do you have further reading to suggest about this ?
What specifically? Everything I've written is in the "Dear ImGUI" documentation, which you will mostly find in its source code. The part about writing an editor using Dear ImGUI is something I figured out myself at my job. I think Dear ImGUI has better support for layouts then it did when I wrote my editor, which was around 5 years ago. But you can see images of ImGUI efforts: twitter.com/proceduralguy/status/9...
Yes, you can. . But it isn't trivial. Here is my unfinished solution: github.com/0lru/p3ui (I think it'd require something like virtual dom in React to be lock-free and smooth). The thing I like about "ImGui" is its functional scope. Most of the provided frameworks here do not include performant plotting libraries like ImPlot. Although even ImPlot is not as performant as it could be. When looking into chrome and other GUI-related frameworks like React with its virtual dom, you begin to understand the problems and their solutions. In the end, it seems it's not only a rust-related problem. I don't know any framework that would make me fully satisfied, in any language, yet.
that's a really good, up to date and complete comparison of available rust GUI solutions!
only egui should be also added to the list
I might add a section or make another article about this and other immediate mode GUIs... My only concern was, and still is, that these are more useful for gaming than for desktop apps. To say the truth i didn't try egui yet.. let me try and I'll tell you also what I think...
yes -- i perfectly understand this judgment!
i also wouldn't recommend it for any serious huge project, but it's an extremely simple and lightweight solution -- just like the FLTK port --, which even works well in WASM and on the android platform, although not really as perfect as more native GUI solutions. but if you want to stress the opposite side of the spectra, you should perhaps also mention flutter and its simple C-FFI-binding capabilites, which are often used for realizing more advanced GUIs resp. frontends for rust applications on mobile devices.
nevertheless, i really like your list and presentation of the different available solutions.
Then maybe I would surely need to make a take two, with egui and other immi mode GUIs, Flutter, and some others I discovered very recently, such as neutrino (too bad some are unmaintained tho 😥). If you know more that could go on this list, please let me know! I left open for discussion the first post, so maybe we can add GUIs to the list. The more the options the better!
What a MASSIVE article! Kudos to your work. Kinda reminds me that Rust aims at correctness over simplicity. A world where GUIs might not be the primary focus. I hope you article helps getting more GUI tractions!
I do not believe the following quote is true:
"The other caveat is that the executable may send diagnostic data to one of Terra Informatica 's servers. They are very clear that it may, and maybe (for what I read) it's just diagnostic (it should not infringe the EU protection laws in matters of personal data...). Anyway, the important thing is that you are aware."
Where did you read this?
Here's the answer from the author (I believe)
The key distinction he does is between may send, and does send, which I think is fairly represented in the article.
Bear in mind, the author is campaigning to raise money to open source the software, so this actual or potential behavior might soon be removed.
Okay, I was quite surprised to read this because I've been experimenting with Sciter for awhile now and I have a firewall setup to require my permission anytime any application tries to use the internet.
And Sciter has never attempted to do so, apart from instances where I've deliberately used its URL loading functionality.
In fact, as he was saying, maybe it was a mechanism in place that was never used. In any case it's nice that they've been forefront in this, stating the code was there in place.
Do you think it is appropriate to use Rust for desktop GUI app ?
My concern is file size and compile time, esp in comparison to C/C++.
I build two simple button apps like shown in this article; one used Rust with GTK, the other used C++ with GTK (gtkmm). I got the following result :
sixtyfps.io/ is being mentioned in other sites (Reddit, lobsters), so I thought I'd leave it here.
I did a small test project with slint-ui.com/ (they renamed themselves in February 2022) and was pleased how easy it was to alter the look and feel to match the design guidelines I set as my target.
Anyone willing to share their experiences with it?
I am getting started to use GTK for C/C++.
I am glad seeing that most of successful tools you described here are based on GTK, including Druid. You even gave a good description of GTK here which I agree : starting with GTK first, including using Glade, and then try the others.
That is the path I will take, so that I can use same tools for different languages.
This is gold, incredible content! Thanks for sharing!
This was a very thorough and enjoyable read. Thank you for putting it together!
Just FYI — what you've labelled "LittleVGL" hasn't been called that for a while, it's usually known simply as "LVGL" which is taken to stand for "light and versatile graphics library". You don't need an embedded system to run LVGL, it has an SDL "simulator" or runs on web. Indeed I run it on my dev PC to test all the time. (I use the C API directly, so I can't vouch for the Rust bindings.)
dude you're a hero for taking so much time experimenting with crappy ass libs so we don't have to
Some comments may only be visible to logged-in visitors. Sign in to view all comments.